Nginx直播服务器搭建及推拉流测试
随着业务的增加,Nginx 安装时的模块满足不了现在的需求,需要增加新的模块。
此时需要重新编译 Nginx,但又不想影响原来的配置信息。
其中,服务器采用 nginx + nginx-rtmp-module, 推流采用 EV录屏 或 OBS-Studio, 拉流 采用html5网页播放 或 VLC视频播放器。
nginx-rtmp-module模块文档:https://github.com/arut/nginx-rtmp-module/wiki/Directives#hls
[root@bogon ~]# git clone https://github.com/arut/nginx-rtmp-module.git
录屏:
OBS-Studio: https://obsproject.com
EV录屏: https://www.ieway.cn/
播放:
VLC播放器:https://www.videolan.org/
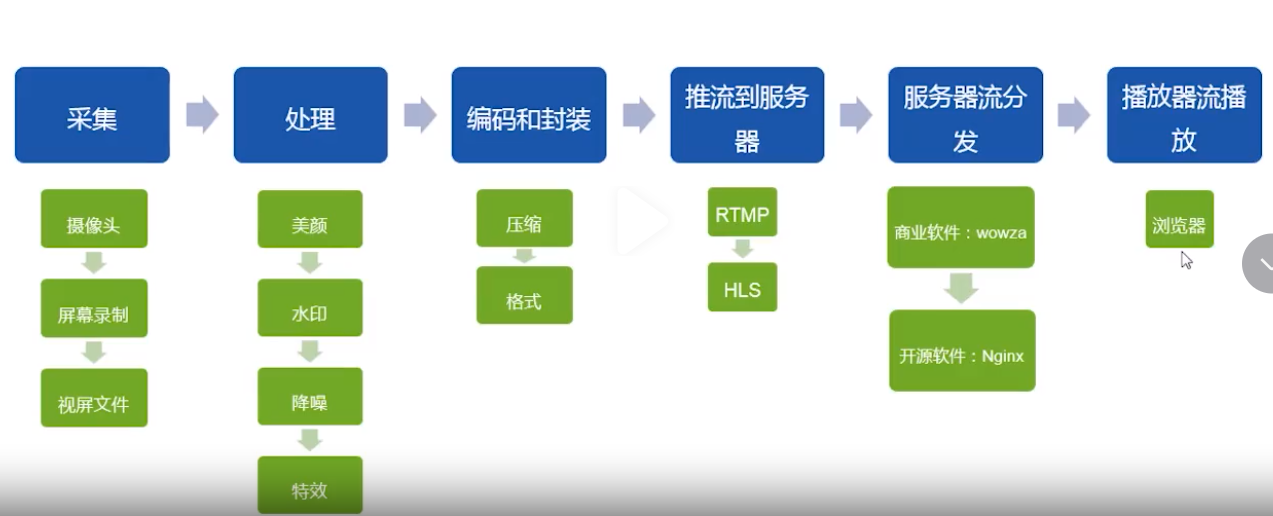
视频直播流程:

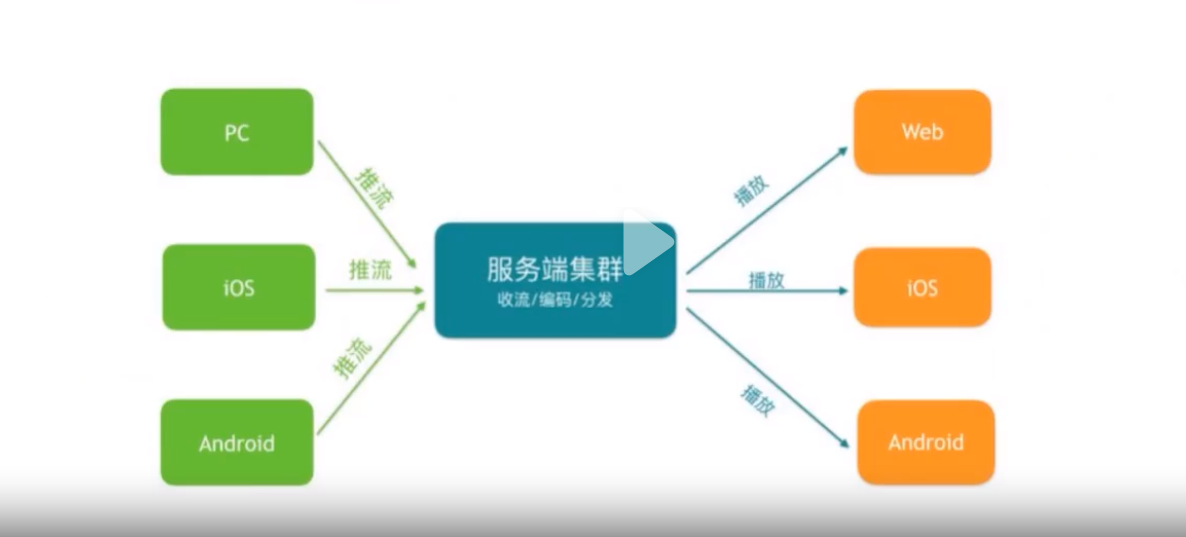
视频直播通用模型:

一、确认已经安装的模块
# nginx -V,注意是大写V
...
configure arguments: --prefix=/usr/local/nginx --with-http_ssl_module --with-pcre=/usr/local/src/pcre-8.42 --with-zlib=/usr/local/src/zlib-1.2.11 --with-openssl=/usr/local/src/openssl-1.1.1-pre9
[root@bogon ~]#
二、重新编译
切到之前下载并解压的目录
[root@bogon ~]# cd /usr/local/src/nginx-1.14.0/
1).下载 源码,(nginx-rtmp-module项目地址:https://github.com/arut/nginx-rtmp-module/)
[root@bogon nginx-1.14.0]# ./configure --prefix=/usr/local/nginx \
> --with-http_ssl_module \
> --with-pcre=/usr/local/src/pcre-8.42 \
> --with-zlib=/usr/local/src/zlib-1.2.11 \
> --with-openssl=/usr/local/src/openssl-1.1.1-pre9 \
> --add-module=../nginx-rtmp-module-1.2.2
2).执行make命令
[root@bogon nginx-1.14.0]# make
不要执行make install。不要执行!!!不要执行!!!
执行make后,当前目录会生成一个objs目录,进入这个目录
目录下会产生一个新的nginx程序文件,这个就是新的程序文件,把之前的备份,产生新的拷贝过去
3).切换旧 nginx 命令
// 备份旧的
[root@bogon nginx-1.14.0]# cp /usr/local/nginx/sbin/nginx /usr/local/nginx/sbin/nginx.back.20240202

// 创建新的
[root@bogon nginx-1.14.0]# cp ./objs/nginx /usr/local/nginx/sbin/nginx
注意:如果在复制 nginx 新文件时,提示,cp: 无法创建普通文件"/usr/local/nginx/sbin/nginx": 文本文件忙
停止nginx服务,复制完成,再重启 nginx 服务即可。
三、确认新命令
[root@bogon nginx-1.14.0]# nginx -V
nginx version: nginx/1.14.0
built by gcc 4.8.5 20150623 (Red Hat 4.8.5-44) (GCC)
built with OpenSSL 1.1.1-pre9 (beta) 21 Aug 2018
TLS SNI support enabled
configure arguments: --prefix=/usr/local/nginx --with-http_ssl_module --with-pcre=/usr/local/src/pcre-8.42 --with-zlib=/usr/local/src/zlib-1.2.11 --with-openssl=/usr/local/src/openssl-1.1.1-pre9 --add-module=../nginx-rtmp-module-1.2.2
此时configure arguments:中已经有了这次添加的nginx-rtmp-module模块。
接下来可以添加相关配置,并开始实现新功能了。
四、修改nginx配置文件
vi /usr/local/nginx/conf/nginx.conf
在文件里加入下面内容 http段外面(加载在最后面就行,独立模块)
http {
    .....
}
在http节点后面加上rtmp配置:


rtmp {               #RTMP服务
	server {
		listen 1935;    #监听的端口
		chunk_size 4000;  #数据传输块的大小,流整合的最大的块大小,这个值设置的越大 CPU 负载就越小
		application live { #rtmp推流请求路径
			live on;    #开启实时
			hls on;     #开启hls
			hls_path /usr/local/nginx/html/ #推流文件保存的路径,要有写入权限
			hls_fragment 5s;        #每个文件包含5秒的视频内容(每个切片的时长)
		}
	}
}


server {
     listen 81;
     server_name laravel.com www.laravel.com;
     root /opt/video/live;

     #access_log /www/access_ abc.log main;
     #location / {
     #    index index.html index.htm;
     #}
    error_page 500 502 503 504 /50x.html;
    location = /50x.html {
        root /usr/share/nginx/html;
    }
    # pass the PHP scripts to FastCGI server listening on 127.0.0.1:9000

    location / {
            types {
                application/vnd.apple.mpegurl m3u8;
            }

            add_header Cache-Control no-cache;

            # To avoid issues with cross-domain HTTP requests (e.g. during development)
            add_header Access-Control-Allow-Origin *;
        }
}
还有就是这个路径,看你自己的实际情况的访问根目录来,我的是/opt/video/live,
然而/opt/video/live肯定没有这个目录,所以需要建一个放流文件的目录hls,并且需要改权限可读可写的权限然后启动nginx:
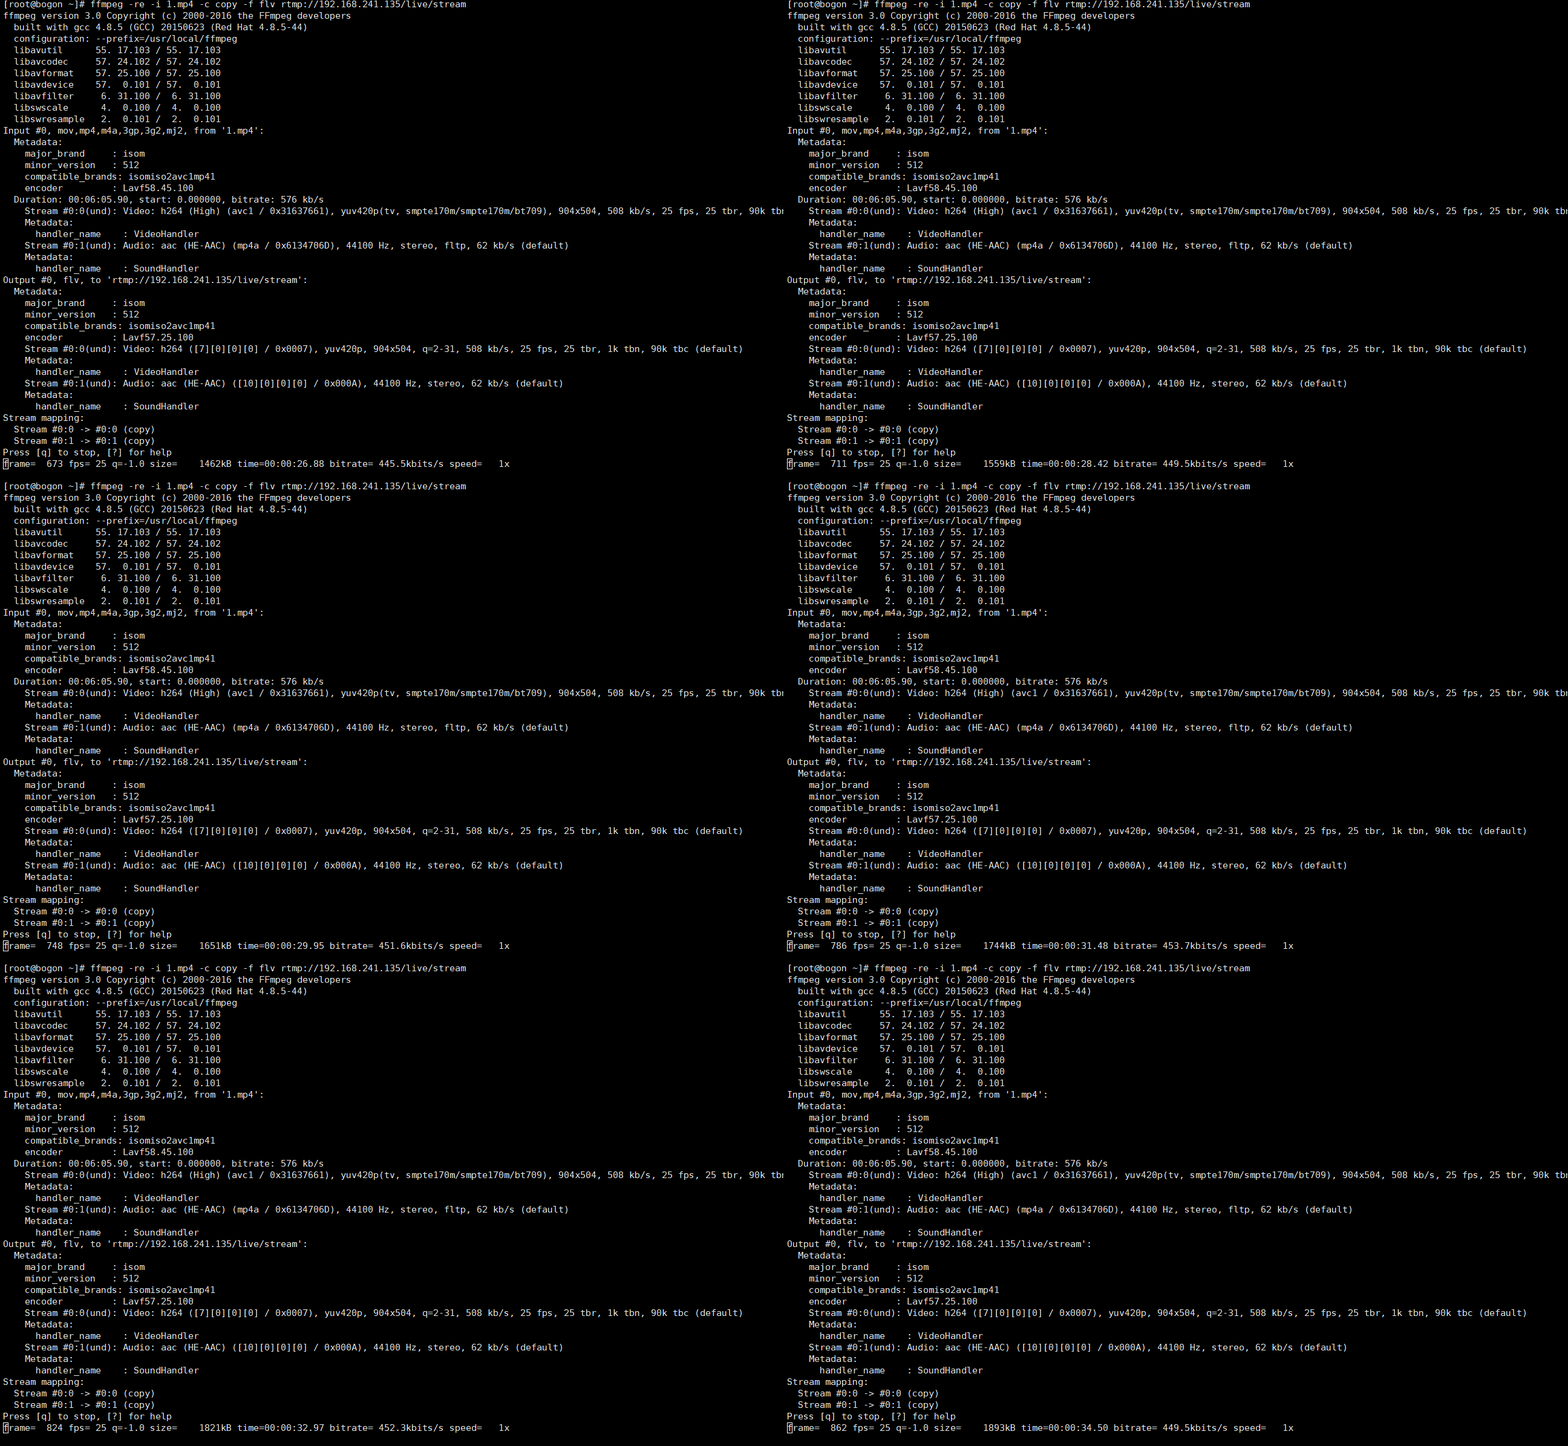
五、直播现成的视频文件(ffmpeg在推流)
可以在服务器安装 ffmpeg 作为播放源。将本地 test.mp4 视频文件推到 Nginx 服务器
[root@bogon ~]# ffmpeg -re -stream_loop -1 -i 1.mp4 -c copy -f flv rtmp://127.0.0.1:1935/live/test
[root@bogon ~]#   ffmpeg -re -i test.mp4 -vcodec libx264 -acodec aac -f flv -y rtmp://192.168.137.128/live1/test1

[root@bogon ~]# ffmpeg -re -i 1.mp4 -c copy -f flv rtmp://192.168.241.135/live/123456

ffmpeg转码
[root@bogon live]# ffmpeg -i ./stream.m3u8 -vcodec copy -acodec copy -absf aac_adtstoasc stream.mp4
ffmpeg -i "rtsp://184.72.239.149/vod/mp4://BigBuckBunny_175k.mov" -c copy -f hls -hls_time 2.0 -hls_list_size 0 -hls_wrap 15 "D:/Program Files/html/hls/test.m3u8"
ffmpeg 关于hls方面的指令说明
六、测试播放
1、使用 vlc播放器,
点击 媒体-打开网络串流- 输入url地址
http://192.168.241.135:81/123456.m3u8、或 rtmp://192.168.241.140:1935/live/123456
即可播放在线直播。
2、pc网页端如何播放rtmp live stream
<!DOCTYPE html>
<html>
<head>
  <link href="https://cdn.bootcss.com/video.js/7.6.5/video-js.css" rel="stylesheet" />
  <script src="https://cdn.bootcss.com/video.js/7.6.5/video.min.js"></script>
  <script src="https://cdn.bootcss.com/videojs-contrib-hls/5.15.0/videojs-contrib-hls.js"></script>

</head>
<body>
    <section id="videoPlayer">

        <video id="example-video" width="600" height="300" class="video-js vjs-default-skin vjs-big-play-centered" poster="">
            <source src="http://192.168.241.135:81/123456.m3u8" type="application/x-mpegURL" id="target">
        </video>
    </section>

    <script type="text/javascript">
        var player = videojs('example-video', { "poster": "", "controls": "true" }, function() {
            this.on('play', function() {
                console.log('正在播放');
            });

            //暂停--播放完毕后也会暂停
            this.on('pause', function() {
                console.log("暂停中")
            });

            // 结束
            this.on('ended', function() {

                console.log('结束');

            })
        });
    </script>
</body>
</html>
七、常见视频流格式
● RTMP(推流端、拉流端)
● RTSP(推流端)
● HLS(拉流端)
● FLV(拉流端)
FLV
● 原生video标签只支持Ogg、MPEG4、WebM三种格式
● 默认需要安装flash插件才可以播放
● bilibili开源flv.js插件可直接转码,vue项目直接使用
○ 推流端视频编码必须是H.264
HLS
● 把整个流分成一个个小的基于HTTP的文件下载,所以不适用直播,延迟会比其他协议的高,对网络质量要求高
● 前端处理HLS格式视频流,引入video.js
RTSP
● 实时传输协议
● 大屏项目大部分视频都是通过安装监测摄像头传输展示的
● 延时低,厂商直接提供,网络负载均衡
● 不支持移动端,浏览器兼容性差,需要低版本浏览器,且安装插件
RTMP
● 基于TCP,实时性高、稳定性高,主要用于直播
● 一般是传输的为flv流
附录:
手把手教你从安装CentOS7.4镜像开始,搭建IoT视频监控系统
在已经安装好的Nginx上增加新模块nginx-rtmp-module,搭建RTMP媒流体服务器
FFmpeg视频合并、视频转码、音视频提取、压制字幕等常用命令合集
本文为崔凯原创文章,转载无需和我联系,但请注明来自冷暖自知一抹茶ckhttp://www.cksite.cn
- 上一篇: linux 下安装Elasticsearch8
- 下一篇: window 下文件快速搜索工具

- 最新评论
- 总共0条评论

