docker容器Hyperf3.1 框架连接宿主机redis
Hyperf 3 提供的缓存默认使用的是 Redis,但是想具体使用 Redis 的一些类型就需要安装组件。本篇文章通过组件来使用 Redis。在使用 Redis 之前确保已经安装 Redis 软件。
第一步:安装组件
composer require hyperf/redis
第二步:配置文件
配置文件位于:config/autoload/redis.php,内容如下:
<?php
declare(strict_types=1);

return [
    'default' => [
        'host' => env('REDIS_HOST', 'localhost'),
        'auth' => env('REDIS_AUTH', null),
        'port' => (int)env('REDIS_PORT', 6379),
        'db'   => (int)env('REDIS_DB', 0),
        'pool' => [
            'min_connections' => 1,
            'max_connections' => 10,
            'connect_timeout' => 10.0,
            'wait_timeout'    => 3.0,
            'heartbeat'       => -1,
            'max_idle_time'   => (float)env('REDIS_MAX_IDLE_TIME', 60),
        ],
    ],];
配置选项如下:
| 配置项 | 类型 | 默认值 | 备注 |
|---|---|---|---|
| host | string | 'localhost' | Redis 地址 |
| auth | string | 无 | 密码 |
| port | integer | 6379 | 端口 |
| db | integer | 0 | DB |
| cluster.enable | boolean | false | 是否集群模式 |
| cluster.name | string | null | 集群名 |
| cluster.seeds | array | [] | 集群连接地址数组 ['host:port'] |
| pool | object | {} | 连接池配置 |
| options | object | {} | Redis 配置选项 |
发布配置文件:
php bin/hyperf.php vendor:publish hyperf/redis
默认已经有了 redis.php 配置文件。
第三步:连接redis:
1、在宿主机中输入以下命令:
ifconfig
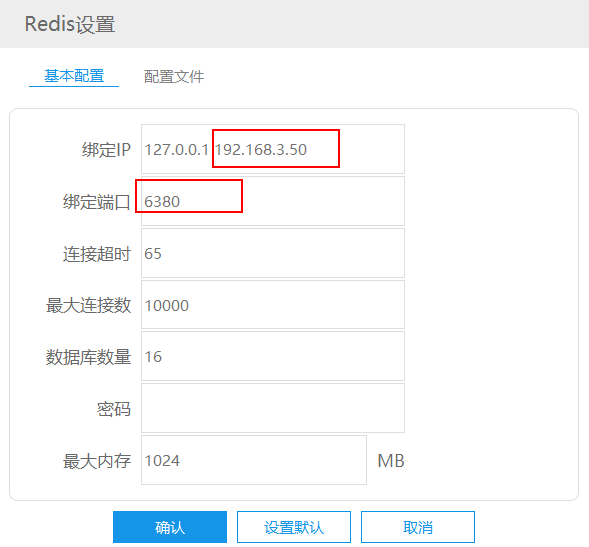
查看对应的IPv4 地址:192.168.3.50
2、找到redis的配置文件redis.conf,找到bind 127.0.0.1这一行,修改如下
因为我本地宿主机使用是 小皮集成环境。这里需要注意端口号默认使用的是 6380。

再找到# requirepass foobared 这行,取消注释,并自行配置密码,然后重启redis服务。
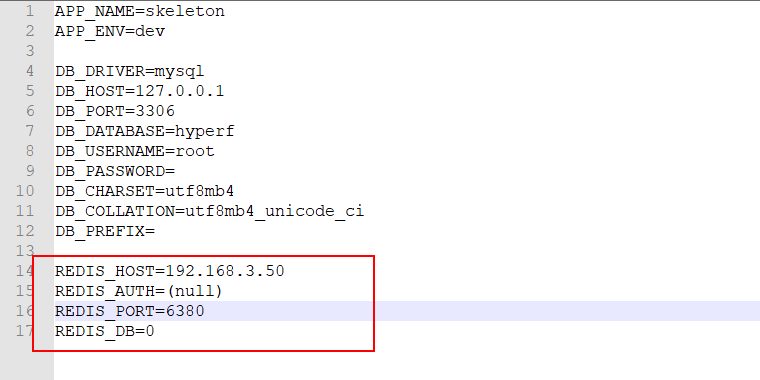
3、最后在Hyperf项目框架中,将连接redis的ip改成上面的192.168.3.50,并加上端口号即可。

第四步:使用 Redis
使用方式一:通过注解使用
新增 RedisClient2Controller.php 文件,编辑内容
<?php

namespace App\Controller;

use Hyperf\Di\Annotation\Inject;
use Hyperf\HttpServer\Annotation\Controller;
use Hyperf\HttpServer\Annotation\GetMapping;
use Hyperf\Redis\Redis;

#[Controller]
class RedisClient2Controller
{
    #[Inject]
    protected Redis $redis;

    #[GetMapping('/redis/storev2')]
    public function store()
    {
        // $this->redis->set('name', '王美丽');

        return $this->redis->get('name');
    }
}
测试:
PS D:\docker\skeleton> curl http://127.0.0.1:9501/redis/storev2
ck
使用方式二、通过容器接口构造实例对象使用
新增 RedisClient3Controller.php 文件,编辑内容
<?php

namespace App\Controller;

use Hyperf\Contract\ContainerInterface;
use Hyperf\HttpServer\Annotation\Controller;
use Hyperf\HttpServer\Annotation\GetMapping;
use Hyperf\Redis\Redis;

#[Controller]
class RedisCLient3Controller
{
    protected $redis;

    public function __construct(protected ContainerInterface $container)
    {
        $this->redis = $this->container->get(Redis::class);
    }

    #[GetMapping('/redis/storev3')]
    public function store()
    {
        //$this->redis->set('name', '郝帅');

        return $this->redis->get('name');
    }
}
测试:
PS D:\docker\skeleton> curl http://127.0.0.1:9501/redis/storev3
curl : Not Found
所在位置 行:1 字符: 1
+ curl http://127.0.0.1:9501/redis/storev3
+ ~~~~~~~~~~~~~~~~~~~~~~~~~~~~~~~~~~~~~~~~
    + CategoryInfo          : InvalidOperation: (System.Net.HttpWebRequest:HttpWebRequest) [Invoke-WebRequest],WebException
    + FullyQualifiedErrorId : WebCmdletWebResponseException,Microsoft.PowerShell.Commands.InvokeWebRequestCommand
PS D:\docker\skeleton> curl http://127.0.0.1:9501/redis/storev3


StatusCode        : 200
StatusDescription : OK
Content           : ck
RawContent        : HTTP/1.1 200 OK
                    Connection: keep-alive
                    Content-Length: 2
                    Content-Type: text/plain
                    Date: Sun, 21 Apr 2024 07:49:44 GMT
                    Server: Hyperf

                    ck
Forms             : {}
Headers           : {[Connection, keep-alive], [Content-Length, 2], [Content-Type, text/plain], [Date, Sun, 21 Apr 2024 07:49:44 GMT]...}
Images            : {}
InputFields       : {}
Links             : {}
ParsedHtml        : mshtml.HTMLDocumentClass
RawContentLength  : 2
使用方式三、通过获取容器对象实现
新建 RedisClientV4Controller.php 文件,编辑内容
<?php
namespace App\Controller;

use Hyperf\HttpServer\Annotation\Controller;
use Hyperf\HttpServer\Annotation\GetMapping;
use Hyperf\Redis\Redis;
use Hyperf\Context\ApplicationContext;

#[Controller]
class RedisClientv4Controller
{
    protected $redis;

    public function __construct()
    {
        $container   = ApplicationContext::getContainer();
        $this->redis = $container->get(Redis::class);
    }

    #[GetMapping('/redis/storev4')]
    public function store()
    {
        //$this->redis->set('name', '王大丽');

        return $this->redis->get('name');
    }
}
使用方式四、通过获取容器对象实现-配置路由routes.php
1.新建 RedisClientController.php 文件,编辑内容
<?php

namespace App\Controller;

use Hyperf\Context\ApplicationContext;


class RedisClientController extends AbstractController
{
    private $redisClient;

    public function __construct()
    {
        $container = ApplicationContext::getContainer();
        $this->redisClient = $container->get(\Hyperf\Redis\Redis::class);
    }

    public function store()
    {
        $this->redisClient->set('name', '郝帅');

        return $this->redisClient->get('name');
    }
}
2. routes.php 新增路由
Router::addRoute(['GET', 'POST', 'HEAD'], '/redis/store', 'App\Controller\RedisClientController@store');
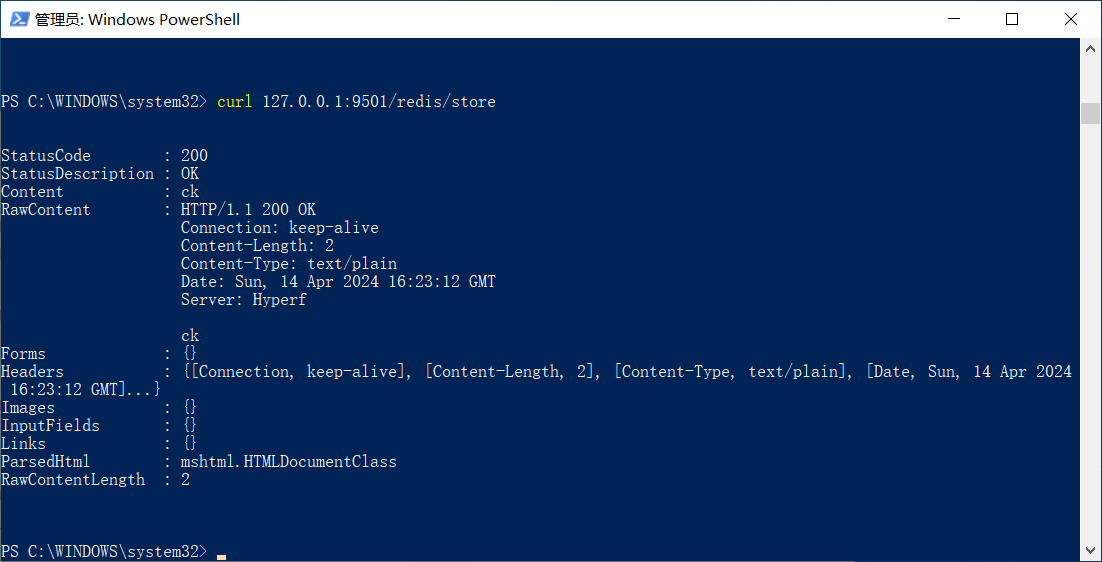
3. 启动hyperf,访问
PS C:\WINDOWS\system32> curl 127.0.0.1:9501/redis/store

参考:
win11 docker 安装redis hyperf 连接redis容器
本文为崔凯原创文章,转载无需和我联系,但请注明来自冷暖自知一抹茶ckhttp://www.cksite.cn

- 最新评论
- 总共0条评论

